|
| SmartCodeStudio |
|
| The Menus |
|
| File Menu |
|
| Edit Menu |
|
| Insert Menu |
|
| Arrange Menu |
|
| View Menu |
|
| Windows Menu |
|
| Help Menu |
|
| The Toolbars |
|
| Main Toolbar |
|
| Arrangement Bar |
|
| Font Bar |
|
| Apply Bar |
|
| Color Bar |
|
| Tool Box |
|
| Barcode Properties |
|
| DataSource Tab |
|
| Fixed |
|
| Database |
|
| Database Settings |
|
| View Data |
|
| Text File Schema |
|
| Format |
|
| Number |
|
| Currency |
|
| Date |
|
| Fields |
|
| Preview |
|
| Counter |
|
| Prompt |
|
| Linked Field |
|
| Code Type Tab |
|
| Color Tab |
|
| Dimension Tab |
|
| Human Readable Tab |
|
| Barcode Symbology |
|
| Database Import Requirements |
|
| Template Dialogs |
|
| Select Template Dialog |
|
| Search Template Dialog |
|
| Customize Template Dialog |
|
| Page Tab |
|
| Label Tab |
|
| Cutout Tab |
|
| Manage User-Defined Templates Database |
|
| Thermal Printer Wizard |
|
| Select Printer and Paper |
|
| Specify Label Size and Layout |
|
| Save Template |
|
| Rectangle Properties |
|
| Roundness Tab |
|
| Border Tab |
|
| Fill Tab |
|
| Dimension Tab |
|
| Ellipse Properties |
|
| Shape Tab |
|
| Border Tab |
|
| Fill Tab |
|
| Dimension Tab |
|
| Line Properties |
|
| General Tab |
|
| Dimension Tab |
|
| Text Properties Dialog |
|
| Text Tab |
|
| Options Tab |
|
| Dimension Tab |
|
| Text From Database |
|
| Database Settings |
|
| View Data |
|
| Text File Schema |
|
| Format |
|
| Number |
|
| Currency |
|
| Date |
|
| Fields |
|
| Preview |
|
| Text From Counter |
|
| Prompt for Text Data at Print Time |
|
| Text From Date |
|
| Text From Time |
|
| Text From Linked Field |
|
| RFID Properties |
|
| Using SmartCodeStudio to print RFID tags |
|
| High Performace Printing |
|
| High Performance and Native Printing |
|
| Image Properties Dialog |
|
| Image Tab |
|
| Properties Tab |
|
| Image From Database |
|
| Prompt for Image data at print time |
|
| Acquire Image Dialog |
|
| Page Setup Dialog |
|
| Page_Tab |
|
| Label Tab |
|
| Cutout Tab |
|
| Print Options Dialog |
|
| Advanced Options |
|
| Number of Labels |
|
| Print Dialog |
|
| Select Records Dialog |
|
| Filter and Sort Dialog |
|
| Initialize Prompt Variables Dialog |
Rectangle Properties - Fill Tab |
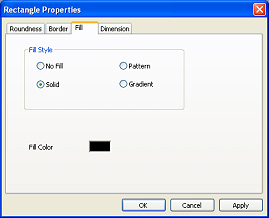
Fill Style
Specify the fill style of the rectangle. This can be
- No Fill - do not fill the shape, it will be transparent and objects behind it can be seen.
- Solid - fill the shape with a solid color
- Pattern - fill the shape with a selected pattern
- Gradient - fill the shape with a gradient
Pattern Fill
The available patterns are
- Horizontal
- Vertical
- ForwardDiagonal
- BackwardDiagonal
- Cross
- DiagonalCross
- 05Percent
- 10Percent
- 20Percent
- 25Percent
- 30Percent
- 40Percent
- 50Percent
- 60Percent
- 70Percent
- 75Percent
- 80Percent
- 90Percent
- LightDownwardDiagonal
- LightUpwardDiagonal
- DarkDownwardDiagonal
- DarkUpwardDiagonal
- WideDownwardDiagonal
- WideUpwardDiagonal
- LightVertical
- LightHorizontal
- NarrowVertical
- NarrowHorizontal
- DarkVertical
- DarkHorizontal
- DashedDownwardDiagonal
- DashedUpwardDiagonal
- DashedHorizontal
- DashedVertical
- SmallConfetti
- LargeConfetti
- ZigZag
- Wave
- DiagonalBrick
- HorizontalBrick
- Weave
- Plaid
- Divot
- DottedGrid
- DottedDiamond
- Shingle
- Trellis
- Sphere
- SmallGrid
- SmallCheckerBoard
- LargeCheckerBoard
- OutlinedDiamond
- SolidDiamond
- Total
Gradient Fill
You can fill a shape with a gradually changing color by using a gradient. A gradient is defined by its direction, start color and end color.
Direction - the direction of the color shift. The available options are
- Horizontal
- Vertical
- Centered Horizontal
- Centered Vertical
- Centered Forward Diagonal
- Centered Backward Diagonal
- Top Left
- Top Right
- Bottom Left
- Bottom Right
- Radial
Start Color - the start color of the gradient. Click on the sunken color button to change the start color.
End Color - the end color of the gradient. Click on the sunken color button to change the start color.