|
| SmartCodeStudio |
|
| The Menus |
|
| File Menu |
|
| Edit Menu |
|
| Insert Menu |
|
| Arrange Menu |
|
| View Menu |
|
| Windows Menu |
|
| Help Menu |
|
| The Toolbars |
|
| Main Toolbar |
|
| Arrangement Bar |
|
| Font Bar |
|
| Apply Bar |
|
| Color Bar |
|
| Tool Box |
|
| Barcode Properties |
|
| DataSource Tab |
|
| Fixed |
|
| Database |
|
| Database Settings |
|
| View Data |
|
| Text File Schema |
|
| Format |
|
| Number |
|
| Currency |
|
| Date |
|
| Fields |
|
| Preview |
|
| Counter |
|
| Prompt |
|
| Linked Field |
|
| Code Type Tab |
|
| Color Tab |
|
| Dimension Tab |
|
| Human Readable Tab |
|
| Barcode Symbology |
|
| Database Import Requirements |
|
| Template Dialogs |
|
| Select Template Dialog |
|
| Search Template Dialog |
|
| Customize Template Dialog |
|
| Page Tab |
|
| Label Tab |
|
| Cutout Tab |
|
| Manage User-Defined Templates Database |
|
| Thermal Printer Wizard |
|
| Select Printer and Paper |
|
| Specify Label Size and Layout |
|
| Save Template |
|
| Rectangle Properties |
|
| Roundness Tab |
|
| Border Tab |
|
| Fill Tab |
|
| Dimension Tab |
|
| Ellipse Properties |
|
| Shape Tab |
|
| Border Tab |
|
| Fill Tab |
|
| Dimension Tab |
|
| Line Properties |
|
| General Tab |
|
| Dimension Tab |
|
| Text Properties Dialog |
|
| Text Tab |
|
| Options Tab |
|
| Dimension Tab |
|
| Text From Database |
|
| Database Settings |
|
| View Data |
|
| Text File Schema |
|
| Format |
|
| Number |
|
| Currency |
|
| Date |
|
| Fields |
|
| Preview |
|
| Text From Counter |
|
| Prompt for Text Data at Print Time |
|
| Text From Date |
|
| Text From Time |
|
| Text From Linked Field |
|
| RFID Properties |
|
| Using SmartCodeStudio to print RFID tags |
|
| High Performace Printing |
|
| High Performance and Native Printing |
|
| Image Properties Dialog |
|
| Image Tab |
|
| Properties Tab |
|
| Image From Database |
|
| Prompt for Image data at print time |
|
| Acquire Image Dialog |
|
| Page Setup Dialog |
|
| Page_Tab |
|
| Label Tab |
|
| Cutout Tab |
|
| Print Options Dialog |
|
| Advanced Options |
|
| Number of Labels |
|
| Print Dialog |
|
| Select Records Dialog |
|
| Filter and Sort Dialog |
|
| Initialize Prompt Variables Dialog |
Acquire Image Dialog |
This dialog allows you to acquire an image from your scanner or camera through the TWAIN interface. You can also perform image cropping, image flipping, or image rotation with this dialog.
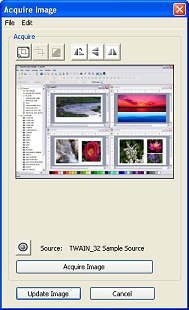
Buttons
Select Source - This button lets you choose the scanner or camera for acquiring the image.
Acquire Image - After the the source has been selected, this button will initiate the actual process of image acquisition. For scanners, this will usually take some time for the whole document to be fully scanned.
Display Crop Tool - This button will toggle the crop tool on or off.
Crop - Clicking this button will crop the image to the selected area in the crop rectangle.
Restore Image - Clicking this button will restore the image to its original state before cropping. It is enabled only after cropping has occurred.
Rotate - This button will rotate the image 90 degree counter-clockwise.
Flip Horizontal - This button will flip the image horizontally.
Flip Vertical - This button will flip the image vertically.
Menu
Select Source - This menu item lets you choose the scanner or camera for acquiring the image.
Acquire - This menu item will initiate the actual process of image acquisition.
Open - This menu item will allow you to select an image file into the Acquire Image Dialog. You may then apply the operations of flipping, rotatiion or cropping to the chosen image.
Save - This menu item will allow you to save the current image in the Acquire Image Dialog to a bitmap file.
Remarks
All images that have been flipped, rotated, or cropped by the Acquire Image Dialog will be converted into a raster file. This means that if the orginal image is a vector-based image such as a metafile (*.emf or *.wmf), it will be converted into raster after processing by the Acquire Image Dialog.