|
| SmartCodeStudio |
|
| The Menus |
|
| File Menu |
|
| Edit Menu |
|
| Insert Menu |
|
| Arrange Menu |
|
| View Menu |
|
| Windows Menu |
|
| Help Menu |
|
| The Toolbars |
|
| Main Toolbar |
|
| Arrangement Bar |
|
| Font Bar |
|
| Apply Bar |
|
| Color Bar |
|
| Tool Box |
|
| Barcode Properties |
|
| DataSource Tab |
|
| Fixed |
|
| Database |
|
| Database Settings |
|
| View Data |
|
| Text File Schema |
|
| Format |
|
| Number |
|
| Currency |
|
| Date |
|
| Fields |
|
| Preview |
|
| Counter |
|
| Prompt |
|
| Linked Field |
|
| Code Type Tab |
|
| Color Tab |
|
| Dimension Tab |
|
| Human Readable Tab |
|
| Barcode Symbology |
|
| Database Import Requirements |
|
| Template Dialogs |
|
| Select Template Dialog |
|
| Search Template Dialog |
|
| Customize Template Dialog |
|
| Page Tab |
|
| Label Tab |
|
| Cutout Tab |
|
| Manage User-Defined Templates Database |
|
| Thermal Printer Wizard |
|
| Select Printer and Paper |
|
| Specify Label Size and Layout |
|
| Save Template |
|
| Rectangle Properties |
|
| Roundness Tab |
|
| Border Tab |
|
| Fill Tab |
|
| Dimension Tab |
|
| Ellipse Properties |
|
| Shape Tab |
|
| Border Tab |
|
| Fill Tab |
|
| Dimension Tab |
|
| Line Properties |
|
| General Tab |
|
| Dimension Tab |
|
| Text Properties Dialog |
|
| Text Tab |
|
| Options Tab |
|
| Dimension Tab |
|
| Text From Database |
|
| Database Settings |
|
| View Data |
|
| Text File Schema |
|
| Format |
|
| Number |
|
| Currency |
|
| Date |
|
| Fields |
|
| Preview |
|
| Text From Counter |
|
| Prompt for Text Data at Print Time |
|
| Text From Date |
|
| Text From Time |
|
| Text From Linked Field |
|
| RFID Properties |
|
| Using SmartCodeStudio to print RFID tags |
|
| High Performace Printing |
|
| High Performance and Native Printing |
|
| Image Properties Dialog |
|
| Image Tab |
|
| Properties Tab |
|
| Image From Database |
|
| Prompt for Image data at print time |
|
| Acquire Image Dialog |
|
| Page Setup Dialog |
|
| Page_Tab |
|
| Label Tab |
|
| Cutout Tab |
|
| Print Options Dialog |
|
| Advanced Options |
|
| Number of Labels |
|
| Print Dialog |
|
| Select Records Dialog |
|
| Filter and Sort Dialog |
|
| Initialize Prompt Variables Dialog |
Barcode Properties - Fixed Tab |
The barcode data will be entered directly into a static text box. The way the text box is displayed depends on the type of barcode selected in the Code Type Tab.
For example, for ISBN barcode, a prefix of 978 (static text) is placed before the text box and together with the input data will be used to generate the barcode.
The check digit of the barcode is also calculated automatically and placed behind the text box. The text box also restricts the type of data that you can enter. For example, for barcodes that only accept numbers, the text box will not allow you to key in alphabets. Below the text box, a brief description of the type of data that needs to be entered is explained.
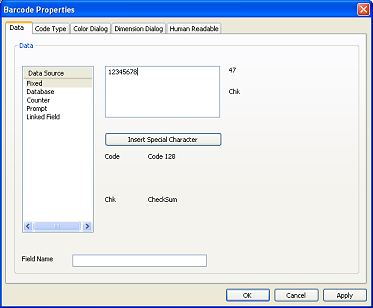
Insert Special Character - This button will be visible for barcodes that support Special Characters. It allows you to insert special ASCII characters like NULL, SOH, etc.
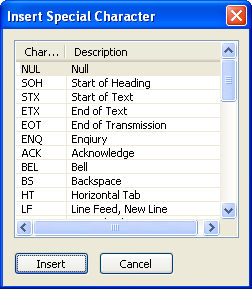
The button brings up a dialog box, which displays the supported special characters. After selecting the special character and clicking OK, the special character will be pasted into the static text box.
Field Name - name of the input field. This variable name can be used in the Linked Field feature. For example, you can have two fields. One is Serial Number, the other, a Part Number. This two fields are given the field names serial and part. In the Linked Field feature, the data of this two fields can be combined together to form a new field.