|
| SmartCodeStudio |
|
| The Menus |
|
| File Menu |
|
| Edit Menu |
|
| Insert Menu |
|
| Arrange Menu |
|
| View Menu |
|
| Windows Menu |
|
| Help Menu |
|
| The Toolbars |
|
| Main Toolbar |
|
| Arrangement Bar |
|
| Font Bar |
|
| Apply Bar |
|
| Color Bar |
|
| Tool Box |
|
| Barcode Properties |
|
| DataSource Tab |
|
| Fixed |
|
| Database |
|
| Database Settings |
|
| View Data |
|
| Text File Schema |
|
| Format |
|
| Number |
|
| Currency |
|
| Date |
|
| Fields |
|
| Preview |
|
| Counter |
|
| Prompt |
|
| Linked Field |
|
| Code Type Tab |
|
| Color Tab |
|
| Dimension Tab |
|
| Human Readable Tab |
|
| Barcode Symbology |
|
| Database Import Requirements |
|
| Template Dialogs |
|
| Select Template Dialog |
|
| Search Template Dialog |
|
| Customize Template Dialog |
|
| Page Tab |
|
| Label Tab |
|
| Cutout Tab |
|
| Manage User-Defined Templates Database |
|
| Thermal Printer Wizard |
|
| Select Printer and Paper |
|
| Specify Label Size and Layout |
|
| Save Template |
|
| Rectangle Properties |
|
| Roundness Tab |
|
| Border Tab |
|
| Fill Tab |
|
| Dimension Tab |
|
| Ellipse Properties |
|
| Shape Tab |
|
| Border Tab |
|
| Fill Tab |
|
| Dimension Tab |
|
| Line Properties |
|
| General Tab |
|
| Dimension Tab |
|
| Text Properties Dialog |
|
| Text Tab |
|
| Options Tab |
|
| Dimension Tab |
|
| Text From Database |
|
| Database Settings |
|
| View Data |
|
| Text File Schema |
|
| Format |
|
| Number |
|
| Currency |
|
| Date |
|
| Fields |
|
| Preview |
|
| Text From Counter |
|
| Prompt for Text Data at Print Time |
|
| Text From Date |
|
| Text From Time |
|
| Text From Linked Field |
|
| RFID Properties |
|
| Using SmartCodeStudio to print RFID tags |
|
| High Performace Printing |
|
| High Performance and Native Printing |
|
| Image Properties Dialog |
|
| Image Tab |
|
| Properties Tab |
|
| Image From Database |
|
| Prompt for Image data at print time |
|
| Acquire Image Dialog |
|
| Page Setup Dialog |
|
| Page_Tab |
|
| Label Tab |
|
| Cutout Tab |
|
| Print Options Dialog |
|
| Advanced Options |
|
| Number of Labels |
|
| Print Dialog |
|
| Select Records Dialog |
|
| Filter and Sort Dialog |
|
| Initialize Prompt Variables Dialog |
Print Options - Advanced Options |
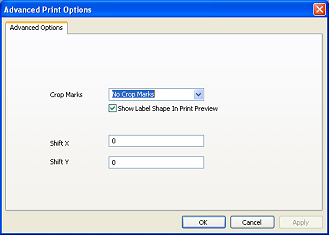
Crop Marks - Crop marks can be added to the printout for each label. They are useful for indicating the exact location of the label when printing on a blank piece of paper. Edge marks are useful if you intend to cut the page with a rotary trimmer or paper cutter.
The available options are
- No Marks - print the label without any crop marks
- Dotted Marks - add a dotted rectangle around each label
- Cross Marks - print a cross at the corners of each label
- Edge Marks - print guiding marks at the edge of each page
Show Label shape in Print Preview - Check this option to draw the shape of the label during print preview. This can help you visualize each label and its content when the shape of the label is irregular (e.g a CDROM).
Shift X - Used to calibrate the Printer. Shift the printed area horizontally by the specified amount. The units are in inches and the shift is to the right for positive values and to the left for negative values.
Shift Y - Used to calibrate the Printer. Shift the printed area vertically by the specified amount. The units are in inches and the shift is down for positive values and up for negative values.