Putting barcodes into Crystal Reports
This tutorial shows how to use SmartCodeDeveloper to create barcodes in a Crystal Report Application. The idea is to create a dataset and add a new column / field to accommodate the barcode. You will write code to process each row in the dataset so when the application loads, it will fill up the extra field with a barcode image. The report will draw the barcode using the image stored in the extra column.
Before you start, please ensure Crystal Report is installed and you are using Visual Studio 2005.
For simplicity, we will use a Access database file (.mdb) for our tutorial. You can download the database here sample.mdb
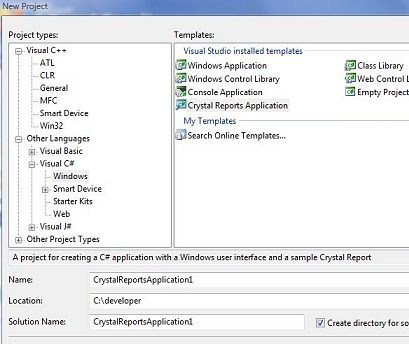
1) Create a Crystal Report Application by selecting File::New Project . Choose the Crystal Reports Application Template and name the project CrystalReportsApplication1.
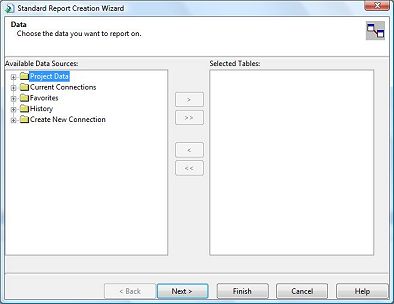
2) Next, you will see the dialog for choosing data. Click Cancel to dismiss it for now. We will come back to this dialog later.
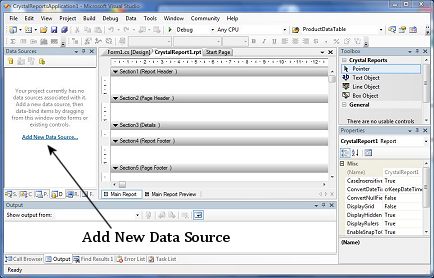
3) You will now be at the main screen for your CrystalReportApplication. Choose the Data Sources Tab and click on the link Add New Data Source to define a dataset for your application.
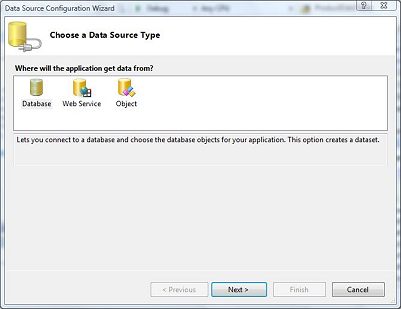
4) Choose Database and click Next
5) Click the New Connection button to create a new connection.
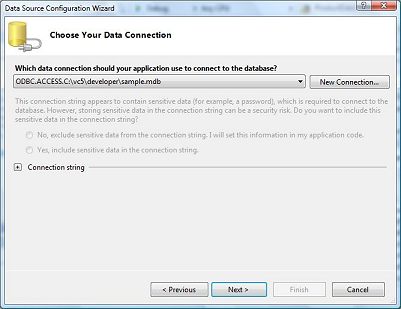
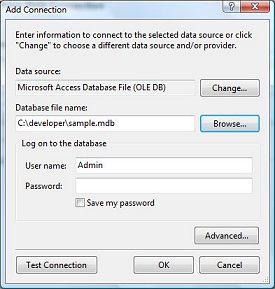
6) You will see the following dialog. We will setup our connection here. Since we are using a MS Access database, click the Change button and select Microsoft Access Database File (OLE DB). Click the browse button and choose the database file sample.mdb you have downloaded. In our example below, we have placed the sample.mdb file in the C:\developer folder.
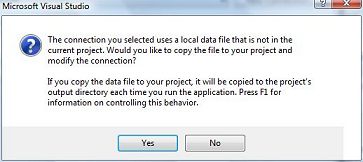
7) A message box pops up. Click Yes.
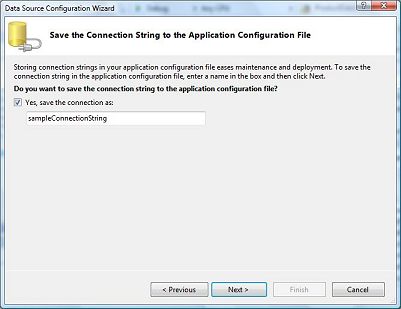
8) Use the default name sampleConnectionString. Click Next
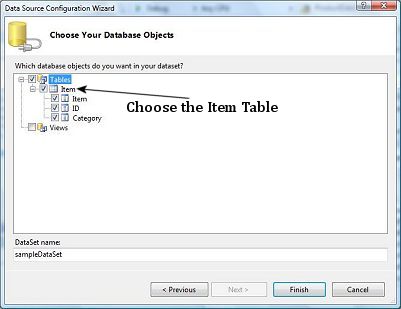
9) Choose the Item table and click Finish. You have now successfully defined a Dataset for your application.
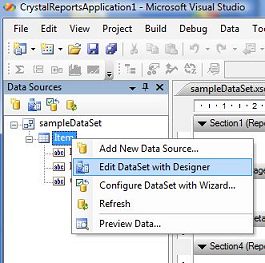
10) At the main screen, you will see the sampleDataSet and its tables. The Item table has three fields, Item, ID and Category. We need to create another field in the dataset so that it can hold the barcode that we are going to create and be linked up with the report. Right click on the Item table and choose Edit DataSet with Designer.
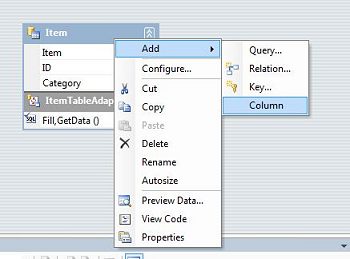
11) You should see the following in the main panel. Right Click on Item (the topmost one) and choose Add::Column.
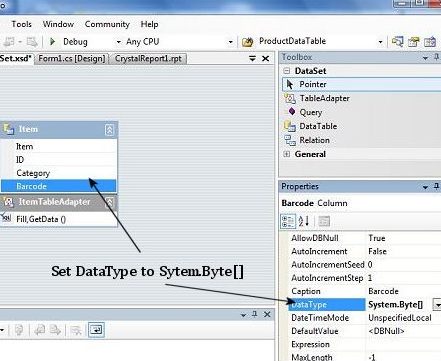
12) Name the new column Barcode. Select the Barcode field and set its DataType to System.Byte[]. You have to manually type in the [] at the end to indicate an array of bytes.
13) Next, go to Field Explorer. We have already defined a dataset for our application in steps 3 to 9. We will now need to define the database fields for the report. The data for the report will be derived from the dataset of the application.

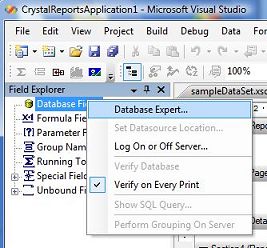
14) Right Click on Database Field and select Database Expert.
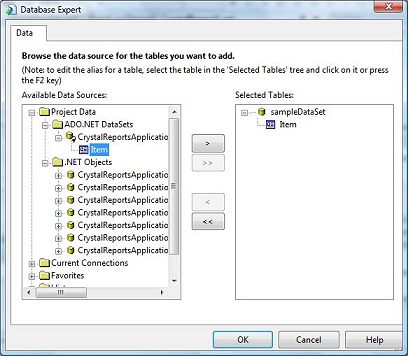
15) A new dialog will pop up. Choose the Item table in sampleDataSet and click the > button to add it. Click OK when you have finished.
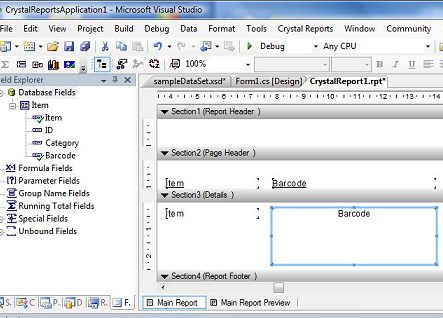
16) You will notice the fields in your dataset (Items, ID, Category, Barcode) are now available in the Database Fields. You can drag the fields and place them in the report. Drag the Item and Barcode fields to the Details section of the report. Try to lengthen the Barcode field in the report so that it has enough space to accommodate the actual barcode image.
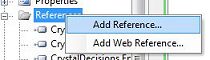
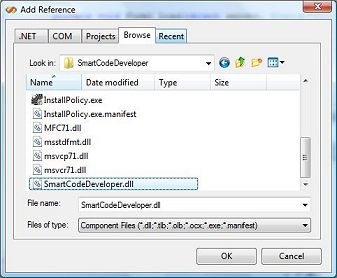
17) We will now need to add code to generate the barcode images. Click to display the Solution Explorer. We will first need to add a reference to SmartCodeDeveloper so that it can be used in our application. Right Click on Reference and choose the Browse tab. Navigate to the location of SmartcodeDeveloper.dll and choose it. (Note : the default path for SmartCodeDeveloper.dll is in C:\Program Files\TechnoRiver\SmartCodeDeveloper).
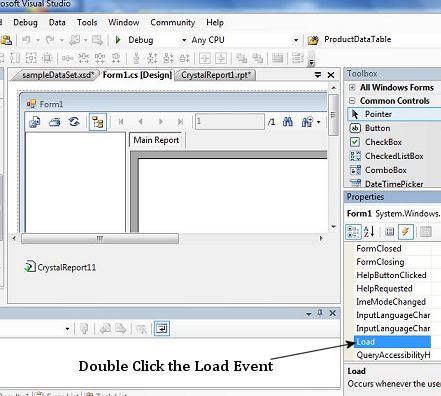
18) We will now add code to our application. We will put them in the Form_Load event handler. This will properly initialize the report and create the barcodes at the start of the applicaton.
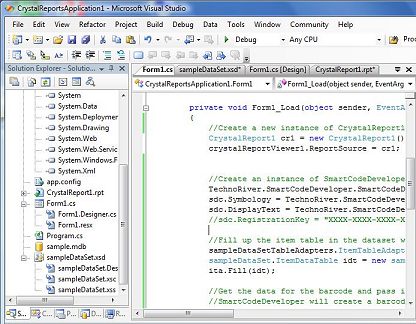
19) Paste the following block of code into the Form_Load event handler. What it does is to create an instance of SmartCodeDeveloper and use it to fill up the extra column (Barcode column) of the Item table of the Dataset. Please note that the code assumes the dataset of the application is named sampleDataSet and the Crystal Report class associated with the application is named CrystalReport1.
{
//Create a new instance of CrystalReport1
CrystalReport1 cr1 = new CrystalReport1();
crystalReportViewer1.ReportSource = cr1;
//Create an instance of SmartCodeDeveloper and initialize it
TechnoRiver.SmartCodeDeveloper.SmartCodeDeveloperControl sdc = new TechnoRiver.SmartCodeDeveloper.SmartCodeDeveloperControl();
sdc.Symbology = TechnoRiver.SmartCodeDeveloper.SmartCodeDeveloperControl.BarcodeSymbology.CODE128;
sdc.DisplayText = TechnoRiver.SmartCodeDeveloper.SmartCodeDeveloperControl.BarcodeDisplayText.Yes;
//sdc.RegistrationKey = "XXXX-XXXX-XXXX-XXXX";
//Fill up the item table in the dataset with the adapter for sampleDataSet
sampleDataSetTableAdapters.ItemTableAdapter ita = new sampleDataSetTableAdapters.ItemTableAdapter();
sampleDataSet.ItemDataTable idt = new sampleDataSet.ItemDataTable();
ita.Fill(idt);
//Get the data for the barcode and pass it to SmartCodeDeveloper
//SmartCodeDeveloper will create a barcode for the data in PNG format and set it to the Barcode field
//In this example, we use the Item Field in the Item Table for the data
int rows = idt.Count;
for (int i = 0; i < rows; i++)
{
sampleDataSet.ItemRow ir = (sampleDataSet.ItemRow) idt.Rows[i];
sdc.BarcodeData = ir.Item.ToString();
ir.Barcode = sdc.GetImagePNG();
}
//Set the datasource for the report to be the item table
cr1.SetDataSource((DataTable)idt);
}
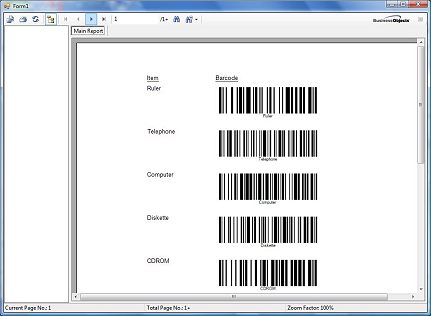
20) You are now ready to compile and run the application. After a successful build, you will see something as follows
Back to SmartCodeDeveloper Main Page
Related : UPC Barcode